

Sunday, August 21, 2011


Friday, August 19, 2011
Sunday, August 14, 2011
Quick and Effective Facial Photo Retouching
Whether it’s for a friend, family member, or client, retouching images is very common these days. In this tutorial, I will lay down the basics of retouching and take you through the entire process, layer by layer.
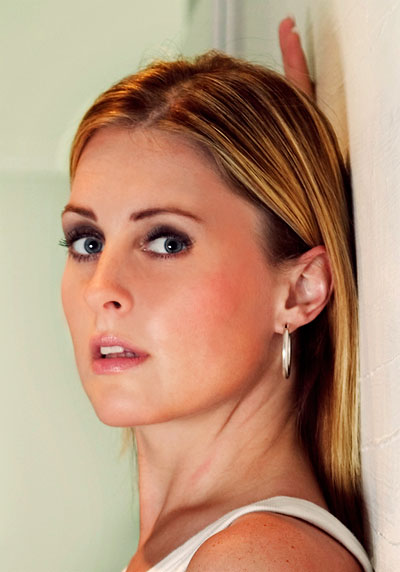
Sadly, I spent my money made from tutorials on ‘Long Island Iced Tea cocktails’ and therefore I am forced, yet again, to live in a box with a broadband connection and a computer. Therefore, I would like to thank Jean Scheijen for providing me with this beautiful free stock image. Free stock images, I love ‘em!
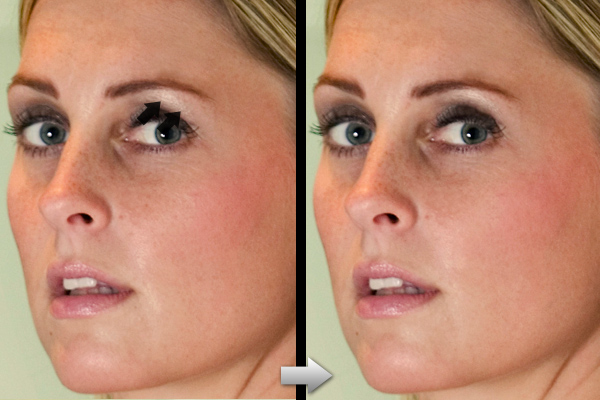
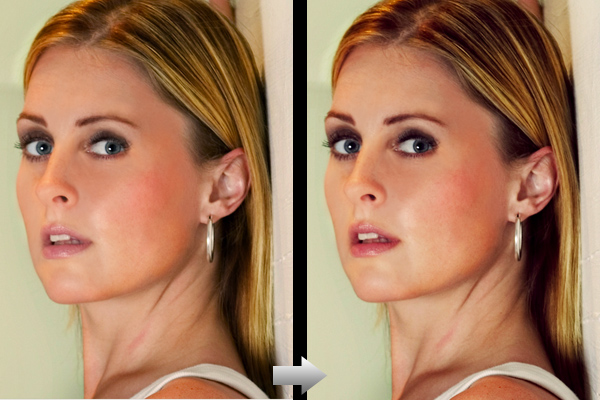
Here’s a before and after (just roll over the image to see the before):

Lastly, before we begin with the actual tutorial, I would like to show you my layer structure. For me, this setup works great. With this setup, I can navigate quickly through my layers and cut down on my work time. All of the layers will be discussed in the tutorial, so don’t worry if the scheme confuses you at the moment.
Step 1
We begin by duplicating the original layer, and with a combination of the Clone Stamp (S) Tool and the Healing Brush (J) Tool, try to remove all spots and blotches that we can find. In essence, we smooth out the skin this way and prepare it for the brushing. It is very important to use a soft brush when working like this, so that the end result blends better with the surrounding skin. If an area is hard to tackle, use the Clone Stamp Tool first and then blend the treated area with the healing brush.

Step 2
Symmetry is naturally attractive to human beings, and there are certain ‘lines’ that run across the face that when these are symmetrical, the subject seems to be more attractive to the eye. So let’s give our subject a little plastic surgery. Duplicate the layer, and using the Forward Warp Tool found in the liquefy gallery (Filter > Liquefy… or Shift+Ctrl+X), raise the area around the eyebrow just a little.
Step 3
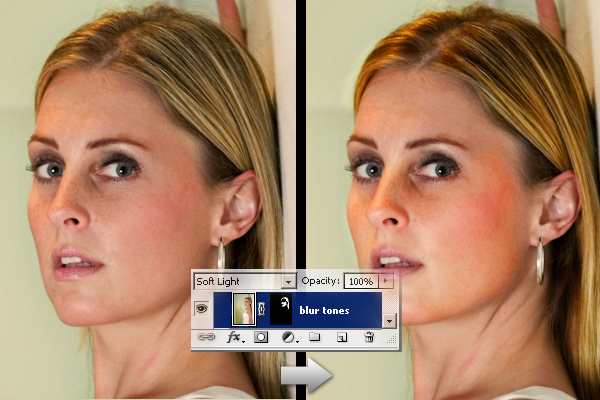
Right now, we’ve come to the point where we can fiddle a bit with contrast, enhancing it further as we go. Let’s use a modification of a well-known technique called the ‘Angel face’ technique…at least, that is what I always call it. Again, duplicate your layer and then go to Filter > Blur > Gaussian Blur and give this layer about a 8-10px blur. After this we set this layer to ‘Soft Light’. Since we do not want this effect to be visible everywhere, I added a Layer Mask and filled that with black, concealing the effect. Then I took a big white, soft, round brush set to around 30-50% Opacity and started brushing around the nose, cheeks, eyes, and hair to enhance their color. This effect can do miracles for blond hair since it can transform it from a dull yellow-ish color to a vibrant gold color.
Step 4
Now we’re going to focus on the actual airbrushing. This is a delicate process that requires a certain amount of patience and experience. Depending on your wishes or your client’s wishes you will have to decide how much airbrushing you want to apply. For instance, models in magazines and especially adult magazines are usually heavily airbrushed since they have to look ‘perfect’. On the other hand there are cases where you might just want to tweak the face by removing a few wrinkles or smoothing out the skin in a few places. For this reason, when I do the airbrushing, I generally do it over a few layers which gives me the option to switch layers on and off depending on how much texture I want to preserve in the end. On this image, I did the major airbrushing in two layers and merged them afterwards.
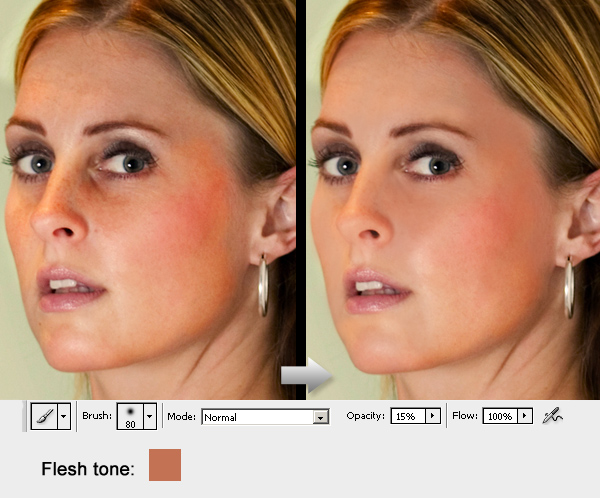
The trick is to use a low opacity (between 10 and 20 percent) soft brush. The color we pick comes from the image itself. When we pick the color, set the sample size of the Eyedropper Tool (I) to 51 by 51 pixels. If I remember correctly, this feature has only been available since CS2, so if you are using a version before that you will sample the color from a single pixel. Try to select an area where the skin is more or less smooth or set a flesh tone manually. Brush over an area multiple times and watch it become smoother.
The change is significant, especially around the nose area, and it is even more noticeable when the image is viewed on a much larger scale.
Step 5
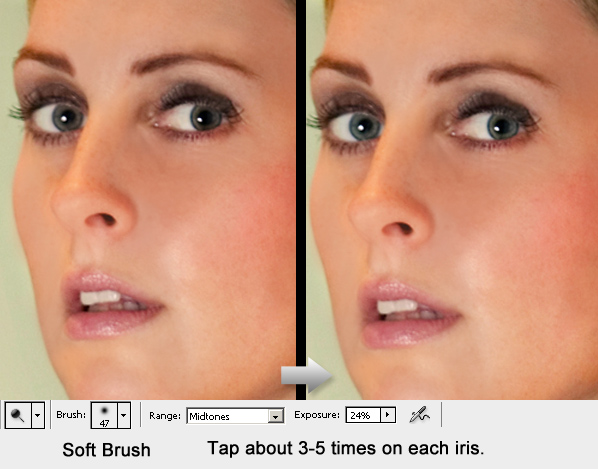
After the airbrushing, let’s tweak the lips and the eyes. The lips have been slightly saturated using the same technique as in step 4, just pick a color from the lips instead. Then make a selection around the eyes and use ‘Layer via Copy’ (Ctrl+J), which can be found under Layer > New > Layer via Copy, to copy the selected part onto a new layer. Make sure this layer is on top at the moment. On the new layer, use the Dodge Tool with the settings shown below to lighten the iris.
Step 6
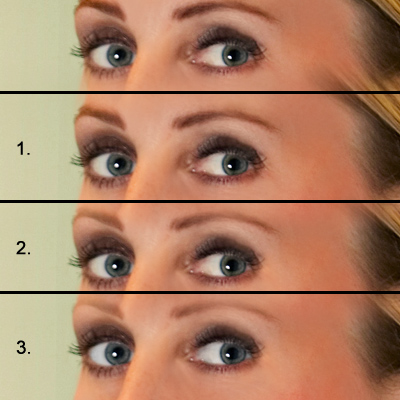
This is the final step before we apply our adjustment layers and bring this piece to life. In this step, we’re going to focus on the eyes a bit more, since these are very important in any portrait photograph.
1. Using a low opacity (15-20 percent) black brush, we enhance the make-up around the eyes. Don’t worry if the change seems small, it will pop as soon as we add those adjustment layers.
2. With the same technique as used in step 4, get rid of those wrinkles around the eyes. Yes, we all have them or we are going to have them, and yes, we all seem to hate them.
3. Finally, let’s desaturate the sclera (the white part of the eye). There are several ways to do this, but I believe that the easiest is simply to create a layer, select a white brush, and go around the white bit of the eye and set the mode of the layer to color. It’s quick, easy and gets the job done nicely.
Step 7
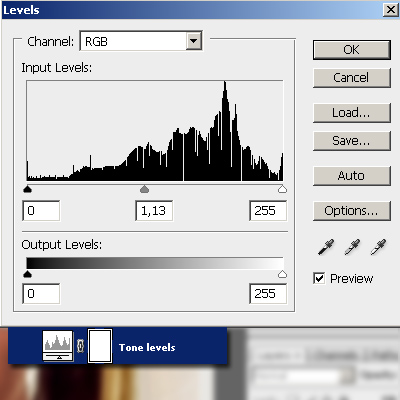
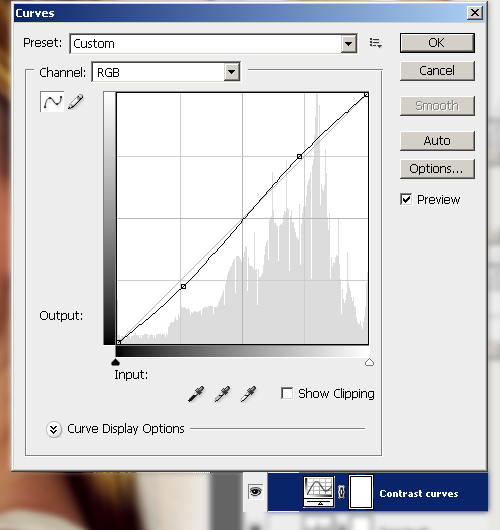
Time for the grand finale. This is the part where we make our picture stand out using the adjustment layers shown below. The adjustment might seem tiny but they make that crucial difference:
The levels and curves layers add contrast to the image as a whole and enrich the colors.
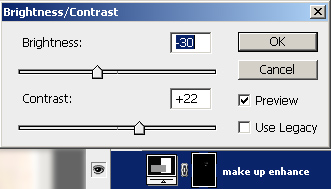
The brightness/contrast adjustment layer makes the make-up around the eyes and the lips pop out. As you can see, there’s a mask applied to the layer. It is entirely black (therefore hiding the effect) except for the area around the eyes and the lips.
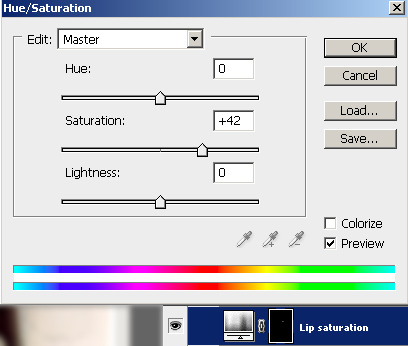
The lip hue/saturation adjustment layer adds a vibrant pink color to the lips. Again a mask is applied to limit the effect strictly to the inner area of the lips.
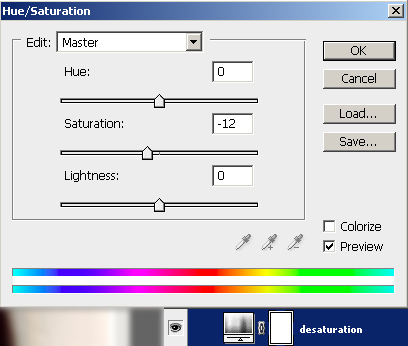
And finally, another hue/saturation adjustment layer to slightly remove the warm shade from the face.
And well, did all of this make a difference? You decide:
Conclusion
Well there you go, a complete overhaul. Oh, and just in case there’s this voice in your head saying ‘Well, she looks too fake,’ send the image around to some friends and ask if they think that to. When you actually see the process take place, the person seems to look fake afterwards because you know what is wrong, but when you show the image to someone who doesn’t know it’s a Photoshopped image, you will get a completely different response. Download the PSD to see the larger image and you will appreciate the work even more (available via Plus Membership).
Have fun!
Exposure blending tutorial
We all have had this issue pop up every once and a while when shooting, I saw this post and wanted to share it this morning.
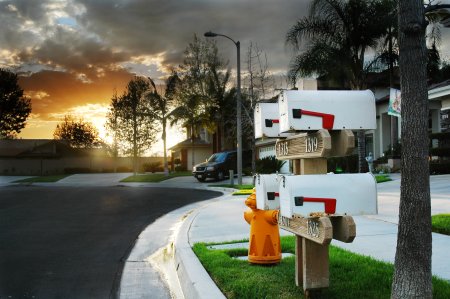
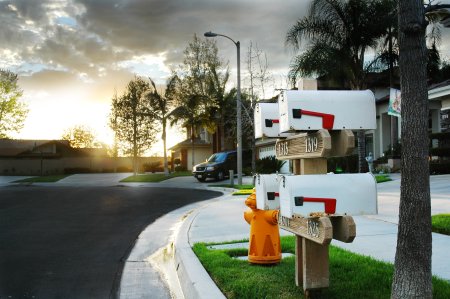
Final HDR result—this is what we’re going for. 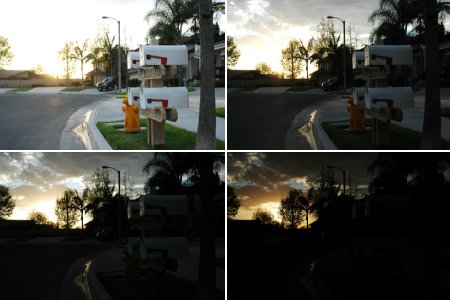
Exposures chosen for HDR blending. 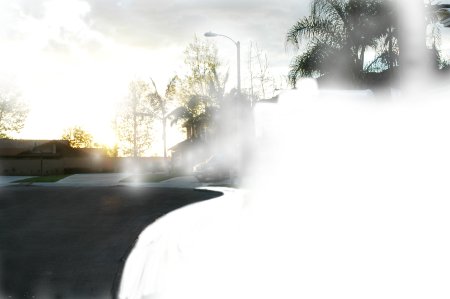
Layer 2 mask (one from bottom) 
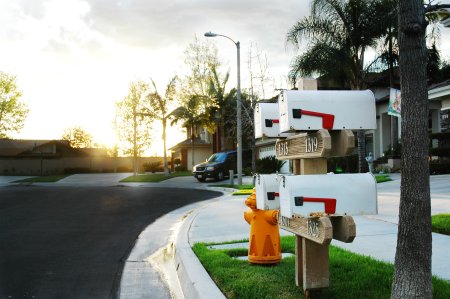
Layer 1 (bottom) by itself
Exposure blending tutorial
// April 1st, 2007
After posting Getting the Exposure Right, I received a quite a few questions about how I achieved the HDR (High Dynamic Range) version of the mailbox photo (last photo in that article). This tutorial will walk you through the basics of creating the same look by hand. All you need is camera and photo editing software that supports layer masking (you can follow these steps in Photoshop, Paint Shop Pro, and The GIMP, among others).
A little background: HDR is a type of image manipulation. The goal is to blend multiple exposures of the same scene into a single image in order to get a result that has more dynamic range than your camera is capable of recording. Typically this applies when you have uneven lighting in your scene as in the example photo.
Final HDR result—this is what we’re going for.
The first step in creating an HDR image is to shoot your scene multiple times at different exposure settings. A tripod comes in handy here. The idea is to get at least one frame with the correct exposure for each region of your scene. In this case, there are four regions I want to capture full detail in: the sunset, the clouds surrounding the sunset, the middle ground trees, and the mailboxes in the foreground. I started shooting with the exposure set for the mailboxes and then gradually decreased the exposure in steps of about 2/3 of a stop, taking a shot at each step, until I got a good exposure for the sunset. I ended up with about 10 frames but decided just to use the following four in the final image:
Exposures chosen for HDR blending.
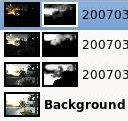
The next step is to load these images up in your image editor of choice. Create a new image and stack each of these exposures in separate layers. You can go from darkest to brightest or brightest to darkest—whichever way you choose, keep them in order. I chose to put the darkest layer on top and the brightest foreground layer at the bottom of the stack.
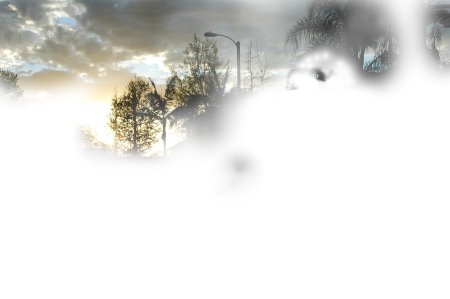
 Then I add masks to my top three layers so that they are hidden (the contents of the masks are black). This effectively removes the top three exposures from the image and lets the fourth, bottommost image show through. Now grab a largish brush with a soft edge and paint white onto the black areas of the masks where you want the associated image to show through.
Imagine you are looking down on a set of transparencies stacked one on top of the other. Where the mask is black, the layer beneath shows through. Where the mask is white, the image in that layer is what you will see. Gray portions of the mask blend the layers smoothly.
This step can be quite time consuming and you’ll find yourself going back and forth painting different portions of the masks on different layers to bring out more or less detail in your final photo. Start with a large, soft brush to quickly get to a rough draft. Later, switch to smaller brushes to make refinements.
The masks for this project ended up being quite complex. Here are the individually masked layers:
Layer 2 mask (one from bottom)
Layer 3 mask
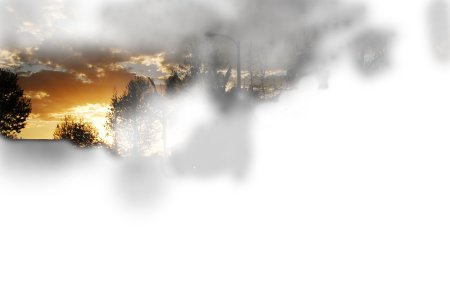
Layer 4 mask (top)
The following images demonstrate how these masks combine together to achieve the final result:
Layer 1 (bottom) by itself
Layer 2 is added on top of that. Notice this layer was used to bring in detail in the clouds and to darken the street for additional contrast.
Layer 3 added. More cloud and tree detail.
Layer 4 added. Sunset detail. Final result.
This technique is time-consuming and difficult to master. A good way to ease yourself into this kind of manipulation is to try blending just two layers together with a single mask. That is much simpler than trying to juggle multiple masks. Two exposure masks are actually very useful in a number of situations. In fact, you don’t even need two separate exposures. This same technique is often used to simply blend an adjustment made to one layer with the layers beneath such that the adjustment doesn’t affect the entire layer. This technique can be used to adjust the contrast only in a portrait subject’s eyes, for example, or to apply localized sharpening or blurring.
Enhancing eyes in photoshop
Photoshop Techniques
Just follow these easy steps!
If you think about it, the eyes of your subject in a glamour, wedding or portrait are usually the most important element in your photo. Here is how you can fix that.
Step one, you can use your dodge tool to lighten the whites of the eyes. You have tp watch this though, you can easily over do it, and the eyes will look fake. To make sure you don't do that, zoom in to the eyes and use your soft brush, set it to maybe 12% and make some move over the whites only.
Step two, Your subejct may have brown eyes, if ou have ever noticed that people with brown eyes, you have a lot of trouble telling the iris of the eye from the pupil of the eye. So to fix this, zoom into your eye, click on a soft brush, set it at 12 or 15% and then use your dodge tool to run it over the brown part of the eye only. This then gives you a bit of a difference between the iris and pupil of the eye.
Step three, If you really want to make the eyes stand out, use a small (2-5px) brush and use the burn tool to the darker the very other edge of the iris of the eye.
Saturday, August 13, 2011
Bennett College, Millbrook, NY


It was such a nice day out today, that my husband, daughter and I piled in the car for a small road trip. I had been playing around on the internet this morning looking for ideas for old run down buildings to photograph... I am still on that kick for some reason, so don't ask. And I found a photo of Bennett College down in Millbrook, NY (Dutchess County).
Note that we knew nothing about this place, other then it was one beautiful old, run down building that I wanted to shoot. It looked like old wood, stone, some cool woodwork and archways. Great texture right? We had thought it was old, from maybe the late 1800's, and as it turned out we were right.
Please note that part of this is part of an apartment complex, so be mindful of people. I parked (you can see my car in a few of these pics) by the front of the building (well it turned out to be the back) and got out.. felt good, was excited about what I was seeing, and how my pics were going to come out. I am not above the smallest of trespass to get the shot I want, but I will not endanger myself, this place was def dangerous. So I vowed to stay safe, use the big lens, and shoot away. Further down my journey in front of the building (this place is HUGE) i started to feel funny, my head was heavy, eyes hurt, and found it very hard to breathe. It was almost surreal feeling (sorry I dont know how to explain it) the further i went, the heavier the feeling. It got hard to talk, and my ears started to bother me. My husband was with me during all of this, and I felt like i had to yell for him to hear me when I was talking. We continued to walk around, and eventually back to my car. My daughter had told us that she experienced a lot of feelings, emotions, blood shed, murder and and even sucide there. She also said that she got sick, and moved the car forward when we walked out of sight.
When we were on our way back home, we did some googling about what had happened there, the school went out of buisness in 1978, but had been founded in 1893 (there is that year again). it was an all woman's school at the time after it was a hotel. The majority of the students committed sucide and some killed other students. That might explain alot of the things, feeling that we both felt today. My husband, of course did not feel a damn thing. I felt fine on the way home, until I opened the photos to look at them.. and I got the same feeling as I did when we were there, but on a leser scale.
I wanted to post what happened to me and my daughter today.. because I really havent had anything like that happen since I last visited the witche's grave.
Not my video: but you can see it better with no leaves on the trees
Thursday, August 11, 2011
Photorestoration

Now I have to say, this isn't something I have considered before.. but being assigned to do something at work, forced my hand... in a good way!
So this is of an Alumni of Rensselaer Polytechnic Institute, 1874
Things going on around...well life
Life can change at a split moment, and be forever different. I am leaving that, and the art on how to let go of things that can not be changed nor controlled. It is very hard mind you, we are all out there in the world, and we all want to protect our families, give them the best that we can in everything, make sure that they grow up and be good people.
Life can throw curve balls, but its all how you react to them and move forward right? So here is to moving forward!
Life can throw curve balls, but its all how you react to them and move forward right? So here is to moving forward!
Ghost Hunts of Sorts
On our visit to see my brother and his family last summer in Mineral, VA my brother had decided that he wanted to go on a ghost hunt of an old cemetery that houses civil war era soldiers. Now I know, you have a lot to contend with, when you are at a cemetery... but I have a few videos to post:
Spotsylvania Video 1
Spotsylvania Video 2
Spotsylvania Video 3
I had my camera, Nikon D200 with 2 full batteries (oh come on now, what kind of photog would I be if they weren't fully charged...right?) and both were dead within 10 min of shooting. It was a very odd place, scared me a bit if I do say so myself. But we did have fun!
I have also attached some stills as well.


Saturday, August 6, 2011
Long Lost Post
Yes, you are reading the dates right, it has been way over a year since my last posting here. Have I decided whether or not I am going to keep this up, the blog that is...I am not sure. Time plays a huge role in actually having the extra hour to blog per day or week for that matter.
I passed along my url to a good friend today, and I guess it spurred me to post something tonight. Its been a long year, I have decided to change my school. Why you ask, recently I have become very un-motivated to take part in any of my classes at AI, as I posted back in May 10, the classes were boring and lacked enthusism even from the professors. Well it had only gotten worse over this year, I went through a term where not only did I not receive any guidence from my professor, they had decided that I was not worthy of the class, and gave me apoor grade. I did all the work, yes, I did the work according to what my interrpution was (it was a photo class) of the instructions. And not once did my professor say 2 words to me. Can I ask, how are you supposed to learn and improve your game if your teacher ignores you? Also, and I feel very strongly about this next point, photography is a form of art, like any other form of art, it is very personal, not everyone is going to like what you shoot or how you shoot something. But does that make it any less of an art form? This came up in another class as well, the professor did not understand why I was shooting what I was shooting, I explained it, but they still did not understand it, and from that moment on, I was the black sheep in the class.
So I went on a search for other schools out there. I know the grass is not always greener on the other side, but there is a point where you are spending all this money for a degree, you want to get the best education you can for your money, and you are just plain old tired of being treated how you are treated. I did some research, contacted a few universities about how classes are run among other things. I got to sit in on a class, see how it worked, how the students and teachers interacted with each other, and loved it. So in January 2012 I am attending Academy of Art. They had sent me a few forms to fill out, answer some questions to waive out of a few basic/intro photog classes, and these questions were above me.. yes I have been in the business for 10 yrs now, but what they were asking, I had no clue about. To me, that tells me what kind of education I was getting at AI and what kind of education I will be getting at AA in January.
On to photography, I have some tips and tricks that I need to post here, but I left my little black book of tips at work, so I will have to get that done next week (I hope). But to Liz, if you are reading this, get a little book and write info on shoots, locations, setting, directions, what is around you at a location in that and keep it with you.. it has helped me numerous times!
I haven't really shot much like I used to, and I have to change that. I think gas prices have played a huge role in that, sadly. I love to shoot, but heck to spend 4dollars a gallon in gas, is hard to do these days. Not that its an excuse, but its just one of those things. I have done some low light work, weddings, and senior photos this year. I think my work has shifted a bit to something more people sided rather then nature sided. I find too that I am using my phone a lot more to shoot, sadly. Not that I dont have a good camera on my phone, it is 8mp.. but I am finding it a lot easier to carry my phone, rather then my 20lb camera pack.
Maybe I need to put together a girls weekend and go shoot with my friends.. any takers?
I wanted to talk too about what it costs for a photographer to shoot a wedding. This topic is always a touchy one for the photographer to bring up to clients/prospective clients. My view on this is,it is your time, your expertise, talent that you are bring to an event or wedding. You know what you have to shoot, and how to shoot it before you even get to the wedding or event. Chances are you have already been out to the location to scout it before the event, so there are no surprises for you as the photographer. Always meeting the B and G and parents (if they are paying for your services) before the wedding. Have some sample work for them to see (if you have any), ask them if they have a budget, ask them what they are looking for photo wise and what they expect from their photographer. A helpful hint is to do a inclusive engagement shoot with the bride and groom, so they are comfortable with you, and how you work ad vice versa. Tell them that you want them to sign a contract (once they have decided on you shooting their wedding), go over the contract and make sure that what they want is clearly listed on the contract. Have them sign it and you follow suit. The way I do it, is at time of booking 50% of the cost is required. Most of the time, its a good chunk of change, if they opt out, forget, change dates, they will be missing that $$. As for cost, it comes down to it as your time.. and its not just the 5 or 6 hrs at the actual wedding.. its the weeks afterwards of editing and enhancing, ordering, printing of the photos. Have a standard price range, 5hrs with 1 photographer for lets say $1500. Its your gig, and if you feel the need to play with the price when you meet witht he clients, feel free.. I know I have done that for friends. To shoot a wedding for 10+hrs for anything lower then $1000 or $1500 is insane, for a potential client to expect anything less is....My opinion on how I would handle that client would be to tell them that I could not shoot their wedding for that low of a price, and that they should call around to some other local photographers for pricing. I might even hand out a few names and numbers as well.. tell them good luck in their search and hang up. So my adivce would be, meet with them, ask about a budget, tell them your standard price and go from there. But always be upfront and sign a contract with them. That covers you!!
I think thats good for tonight.. I know I might have more to say tomorrow, but for now.. good night all.
Subscribe to:
Comments (Atom)